I know it must be lovely to wing your way through the countryside without a care in the world BUT that probably means you’re going to get lost, you’re going to get more tired, you’re going to cycle further and people are going to get grumpy. I have bumped into (faster) cyclists who took two hours longer to get to Newhaven because they used normal roads and got lost – and they would have missed the beautiful countryside. I’ve also bumped into lads who never made it to Paris because they only had a London to Paris cycle guide.
So with that focus I wanted a method which meant we wouldn’t get lost. And not forgetting that I’m a bit tight with my money the solution had to be cheap or free…free would be better. (Although now I’ve got a shiny new cycle computer for navigation.)
Make sure several/half of your group have the ability, software, maps, and routes to be able to navigate. It’s not fair to only have one person as it means they have to ride at the front for the whole ride. Larger groups will stretch out or split at points and you need people at the front and back of each group who can navigate.
So no paper maps whatsoever?
Well, yes, I admit I did take some and I did use them briefly.
I printed off cross-sections of the route and used them to see how far away towns were, but not for navigation as such. In essence I could have just written down towns and how far along each trip they were.
Whatever option you choose…
MAKE SURE YOU’VE TESTED IT WAY BEFORE YOU LEAVE THE UK. Seems obvious, right?
OPTION 1 – Use your navigation-enabled cycle computer
For the first three trips I used my phone (see next section) to navigate but this year I’ll be using my new Wahoo Elemnt. Click the RideWithGPS links against each route, choose the export or send to device options, and get it to your device using your device’s specific guide, which should also be used to learn how to navigate using it.
If you’re using a cycle computer you can safely stop reading the rest of this page.
OPTION 2 – Use your phone
I have used Maps.Me (or Maps With Me as it’s also called) for most trips, you can find Maps.Me on Play store and Apple store.
With Maps.Me, for each route you want go to the RideWithGPS link and download the KML file, which you should send to your phone (via USB, Bluetooth, email, or GoogleDrive etc).
Once on your phone you should open it up with Maps.Me following the Maps.Me guide to help you.
Offline maps are essential
It’s essential you’ve got offline maps on your phone and aren’t tempted to use an online method of viewing, because when you’re in the middle of nowhere, have no mobile signal and no idea which road to go down you’ll feel pretty silly.
Maps.Me gives you offline maps, for free.
Open up Maps.Me, move the map to somewhere you’re going to be cycling, zoom in a little and it will download that map section to your phone.
That map section is now usable offline.
Repeat for all other areas you’re interested in cycling.
How to see the maps
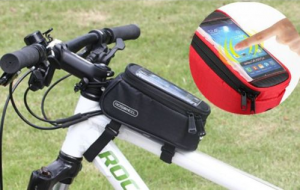
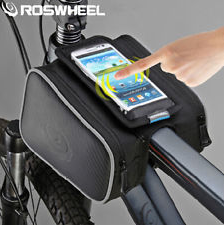 A top tube frame bag is relatively cheap and works very well, apart from as you can expect in very bright sunlight when you’re proudly wearing your new LondonToParis white cycling jersey!
Cost: £5-£10 depending on size of phone.
Sue and I had the one on the left, Alan had the one on the right, Tim had something different again.
But what about battery life?
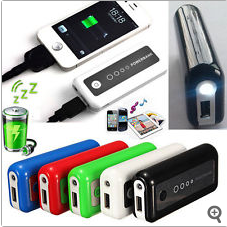
 Well that’s easily solved too, buy a mobile charger.
And put your phone in Flight Mode whilst riding too. Putting my phone in flight mode meant I didn’t need to charge my phone during the ride, even though I had a charger with me.
There’s various chargers around, like the heavy duty ones on the left which will recharge a phone 2 to 5 times or more (£10-£30), to simple single charge ones (£5-£10) like the one on the right.
Cost: £5-£30 or more, depending on how many recharges you want.